WiFi SSIDs on different VLANs
Taking a different direction here and trying out a more HowTo style post. I thought I’d do a quick write-up covering WiFi SSIDs on multiple VLANs, something that might be useful in a home setup, separating SSIDs better from one another. While I usually prefer the CLI, a lot of the devices mentioned here only (or mainly) use a web GUI for configuration management, so this posting will include a lot more screenshots than my usual postings. This posting won’t contain anything exciting for people who run and support networks professionally (mostly just a “so what options are available on SOHO hardware?”), and may even be overly simple and assume settings you wouldn’t do in a professional setup. But it is useful for homelab enthusiasts looking to build a more complex setup than “everything on the same VLAN/network” or trying to figure out “how do I use VLANs, give me an example”.
Ubiquiti and Netgear have some reasonable priced network gear that I’ve written about in the past that behave decent in home networks. For out little setup today we will have a WiFi access point with multiple SSIDs, two switches, and a firewall/router. We will be focusing on the configuration of the WiFi Access Point (UniFi AP) , the two Netgear switches (GS105Ev2 / GS108Ev3) and the Ubiquiti Router (Edgerouter X).
Our goal is to have two SSIDs on the access point, one for the “normal” devices (VLAN 1), and one for separate devices (VLAN 178). Since the router to VLAN 178 is on a different switch than the access point we also need to trunk both VLANs across the network. Another way of looking at it, is that we are expanding Subnet/VLAN 178 into our network (but limiting it to the WiFi Access points). 178 doesn’t hold any special meaning, you can use any VLAN number you want, just chose 178 because the subnet in this test setup was 10.0.178.0/24.
Here is a diagram of our test setup:

VLAN 1: The management and main client VLAN
VLAN 178: Subnet 178, 2nd WiFi network
Netgear 1
Port 1: Connection to Netgear 2
Port 5: Access Point
Netgear 2
Port 1: Connection to Netgear 1
Port 8: Edgerouter
Edgerouter
eth0: Connection to Subnet 178
eth1: Connection to Netgear 2
Wireless Configuration
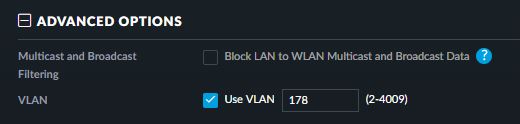
In the UniFi controller go to Settings->Wireless Networks either create a new network or edit an existing one. If you go into the advanced options area, you will find the VLAN setting for that SSID. Activating the option and setting a value means the access point will tag all packets from that SSID to the specified VLAN number.
In the network overview below we see that packets from one network are tagged with VLAN 178, and packets from the other network are untagged (the switch configuration will take care of deciding which VLAN untagged packets are part of).

Netgear Configuration
The Netgear devices only have a VLAN 1 defined by default, so the first step will be to add VLAN 178 to both of them. Enable Advanced 802.1q (VLAN->802.1Q->Advanced->VLAN Configuration), enter the VLAN ID 178 in the box and click on “Add” at the top.

Now let’s move on to the VLAN Membership configuration. To switch settings, just click on the port and it will switch from tagged->untagged->none.
Netgear 1 device
For VLAN 1 we want port 1 to be (T)agged since it is the trunk to the next switch, and all other ports (U)ntagged since they will be dealing with untagged VLAN 1 traffic. The PVID will also be set to 1 for all ports.
For VLAN 178 we want port 1 to be (T)agged since it is the trunk to the next switch, port 5 (T)agged since it is the connection to the access point, and all other ports “none” since none of those ports are part of VLAN 178.


VLAN overview after changing all the settings:

For this scenario it is sane to leave the Port PVID configuration to PVID 1 on all ports. You could change a port to 178 if you are expecting untagged traffic on that port that needs to be in VLAN 178.
Netgear 2 device
Similar configuration as the first switch so I’ll skip the screenshots. Port 1 is the connection to the Netgear 1 device, port 8 is connected to the Edgerouter.
- all ports PVID 1
- VLAN 1 Tagged port 1 and 8, all other ports untagged
- VLAN 178 Tagged port 1 and 8, all other ports none
Edgerouter Configuration:
Make sure the interface switch0 spans all ports you want to use VLANs on. Add the two VLANs 1 and 178. They should show up in the list as switch0.1 and switch0.178, and you can apply firewall rules to these interfaces to restrict traffic if you are doing any routing between the two networks.
We will want to tag everything from Subnet 178 as VLAN 178 on the interface connected to that network (eth0 in our setup), and allow VLAN 178 on the outgoing interface (eth1 in our setup). The Edgerouter doesn’t need us to specifically allow VLANs already set by the PVID, only additional VLANs need to be specified in the vid field.

Where to go from here?
You could put servers or virtual machines in their own subnet/VLAN and then use a firewall to restrict access between the different networks.
Adding more Access Points is straightforward, UniFi automatically applies the wireless configuration to all Access Points it manages, so all you need to do is take care of the switch port configuration.

